
Creating fluffy trees with Three.js (part 1)
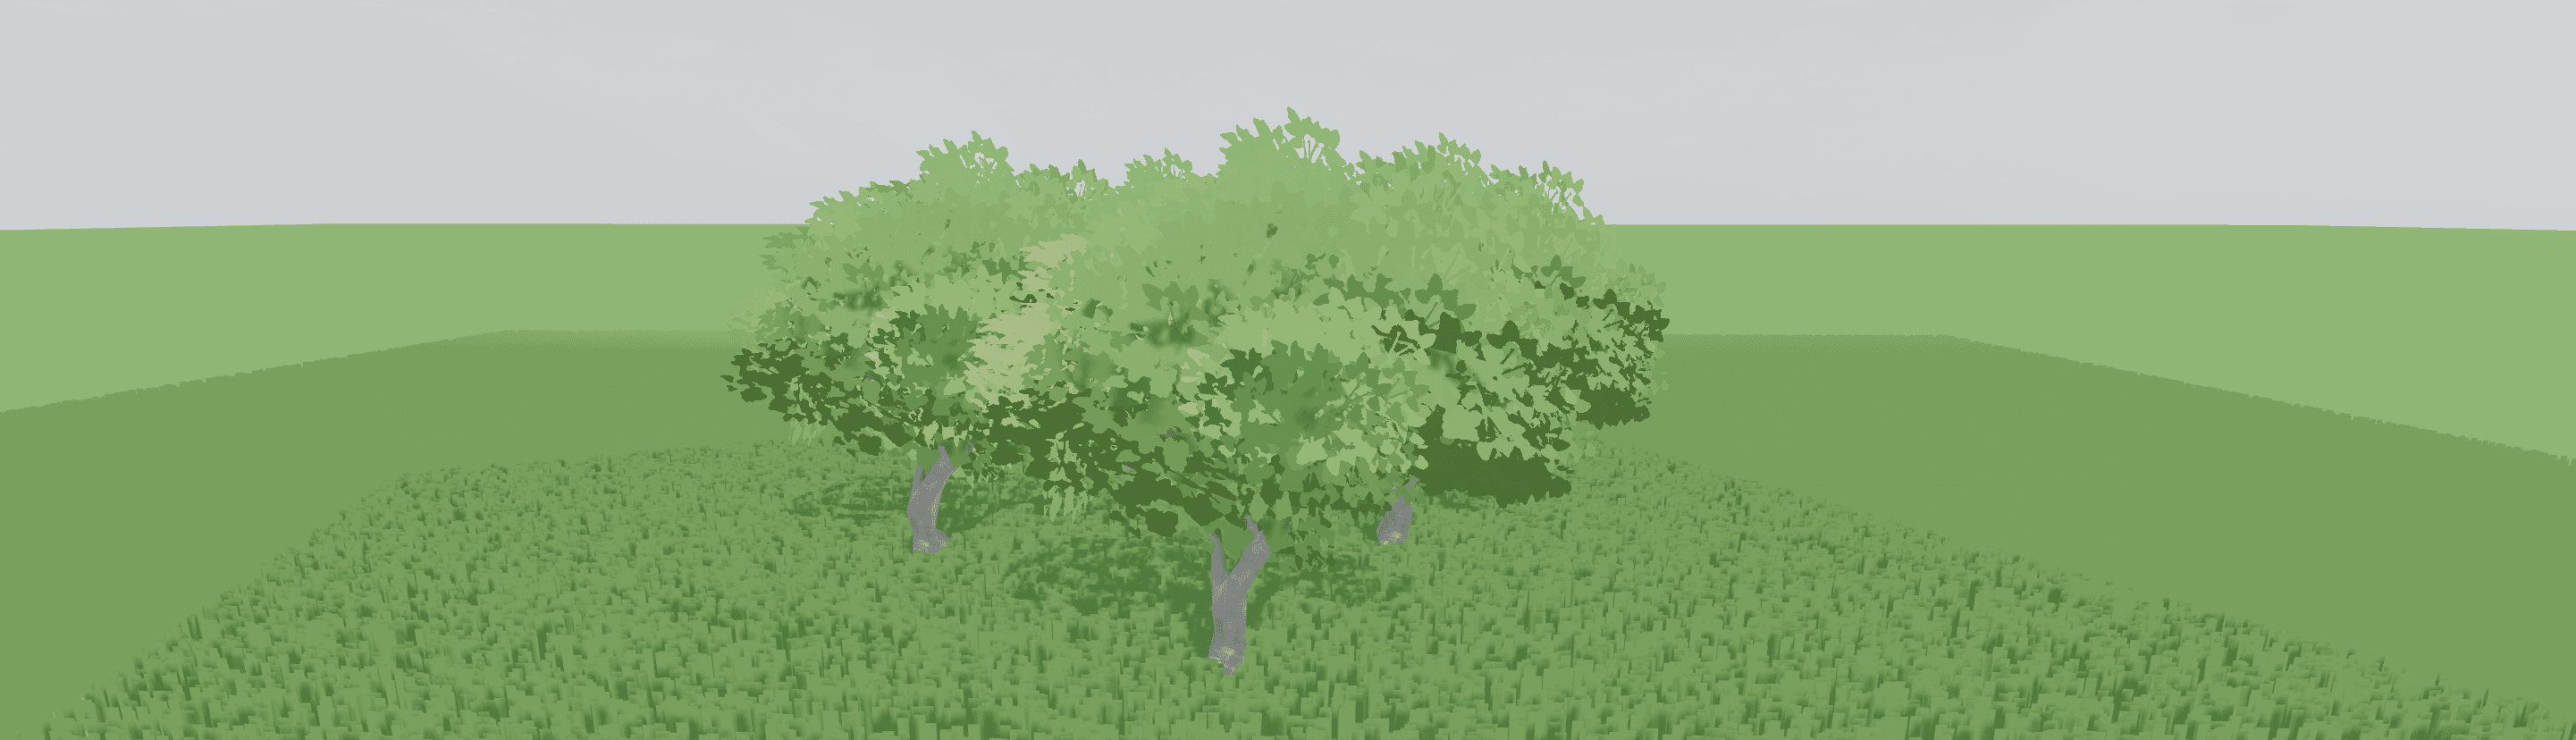
· Michael Dougall · 8 min readAs a side project I've been working on a point & click game using Three.js with React Three Fiber and I'm now filling out the world environment. I found this awesome tutorial by Pontus Karlsson going into detail of how to make fluffy stylized trees and they look fantastic!
Unfortunately it was made for Unity 3D not Three.js... but after some soul searching, taking a GLSL shader course, and a few days of posting on Twitter about it I've gotten something looking great, take a look:
import { Clone, useGLTF } from '@react-three/drei';
import { FoliageMaterial } from './foliage-material';

export function Tree({ position, rotation }) {
  const tree = useGLTF('https://douges.dev/static/tree.glb');

  return (
    <group name="tree" rotation={rotation} position={position}>
      <Clone
        receiveShadow
        castShadow
        object={tree.nodes.trunk}
        inject={<meshBasicMaterial color="black" />}
      />
      <Clone receiveShadow castShadow object={tree.nodes.foliage} inject={<FoliageMaterial />} />
    </group>
  );
}
Really chuffed for how it has turned out! In this two part series I'm going to go over how the effect works and break down each part of it. There's loads of opportunity here to learn something new so buckle up! Make sure to subscribe below and follow me on Twitter so you don't miss the next one.
GLSL shaders
It's important to have some context on what GLSL shaders are. They're small programs written in a C-like language ran on the GPU. As it turns out Three.js is made up of a ton of them! If you've ever used any Three.js material you've already indirectly used them.
WebGL has two kinds of shaders that run in sequence:
- Vertex shaders, that position every vertex of a mesh; and
- Fragment shaders, that color every pixel of a mesh displayed on screen
Shaders have a bunch of built in types,
operators,
and functions
of which we'll primarily use vectors which are classes that hold values such as xyz and uvw.
We'll be using vertex shaders in this series,
their responsibility is to at a minimum convert the vertex position from local coordinate space to clip coordinate space assigning the result to gl_Position.
There's a great article on coordinate systems if you want to learn more but the gist is:
- Start at local space, vertex position is relative to itself
- Transform to world space, vertex position is now relative to the world origin
- Transform to view space, vertex position is now relative to the camera origin
- Transform to clip space, vertices are discarded when outside some range
We won't be going much further into the fundamentals of GLSL shaders if you're keen to dig in I recommend SimonDev's paid course "The Easiest Way to Learn GLSL". I did it and really loved going through it! He also has a great Youtube channel.
Getting the fluffy look
For the foliage effect we want two things to happen to the quads:
- Keep it mostly facing the camera; and
- Scale it up to cover a larger surface area
As it turns out having meshes always face the camera has a name —
"billboarding"!
If you've used @react-three/drei previously (I like calling it the lodash of React Three Fiber) you might be tempted to reach for the Billboard component but it comes with a small caveat: it only affects the entire mesh,
not individual quads on a mesh!
It also doesn't solve the second problem of scaling the quads up.
A mesh is made up of triangles of which there are three vertices to a triangle and two triangles make a quad.
Instead we can use GLSL vertex shaders and UVs from the mesh for the effect. Here we've applied it to a plane, try and rotate around and you'll see that it always stays in view!
uniform float u_effectBlend;
uniform float u_remap;
uniform float u_normalize;

varying vec2 v_uvs;

float inverseLerp(float v, float minValue, float maxValue) {
  return (v - minValue) / (maxValue - minValue);
}

float remap(float v, float prevMin, float prevMax, float newMin, float newMax) {
  float t = inverseLerp(v, prevMin, prevMax);
  return mix(newMin, newMax, t);
}

void main() {
  v_uvs = uv;

  vec2 vertexOffset = vec2(
    remap(uv.x, 0.0, 1.0, -u_remap, 1.0),
    remap(uv.y, 0.0, 1.0, -u_remap, 1.0)
  );

  if (u_remap == 1.0) {
    vertexOffset = mix(vertexOffset, normalize(vertexOffset), u_normalize);
  }

  vec4 worldViewPosition = modelViewMatrix * vec4(position, 1.0);

  worldViewPosition += vec4(mix(vec3(0.0), vec3(vertexOffset, 1.0), u_effectBlend), 0.0);

  gl_Position = projectionMatrix * worldViewPosition;
}
Interestingly it's not actually a traditional billboard effect! If it was the quad would always face the camera with no distortion when rotating around, instead it stretches when not looking at it face on.
Let's go over what's happening.
Translating relative to the camera
The effect is built on the fact that we can translate (move) vertices relative to the camera. Personally when I think of moving things in 3D space I think in local & world space so the mind blowing thing here is since GLSL shaders can move between coordinate spaces you can change the position in each!
To transform the local position into view space so it's relative to the camera we perform some math:
vec4 worldViewPosition = modelViewMatrix * vec4(position, 1.0);
Three.js provides global variables to shaders for convenience. Thepositionvariable is the vertex position in local space which is then transformed through supplied matrixes likemodelViewMatrix.
Now we can translate the vertex in view space,
for example adding 1.0 to the x value results in the vertex moving one unit to the right:
worldViewPosition.x += 1.0;
If we were to subtract 1.0 it would move one unit to the left and so on.
The key aspect here is the translation is relative to the camera,
when rotating around the mesh if the vertices are translated far enough they'll always stay in view.
Using UVs as offset values
Instead of hardcoding values for the translation we want to instead pass data to the shader and we can do this by abusing how UV maps work as each vertex has an assigned [u, v] position.
UV mapping is the process of unwrapping a 3D model so it can be textured enabling something 3D to be represented as 2D.
In the vertex shader there is a global variable (a "uniform" in GLSL speak) that Three.js makes available called uv for each vertex.
Remember the vertex shader runs over every vertex of a mesh meaning the uv value of each vertex will be wherever it is on the UV map.
What we want to do is for every quad of the foliage have it take up the entire UV area. If you're using Blender like me you can do this in a few steps:
- Go to UV editing mode
- Select the faces of the foliage
- Open the UV menu and click on reset
This makes all selected quads cover the entire UV area.
Now when accessing uv for any vertex of the foliage there are only 4 possible values that will be returned.
vec2 vertexOffset = vec2(uv.x, uv.y);
Remapping the UV offset
If you turn off the "remap UVs" checkbox in the example above you'll see the translation is off center.
This is because uv values are between [0.0, 1.0],
instead they should be between [-1.0, 1.0] so the translation is centered.
Remapping values is common in shaders and so a remap function exists to interpolate an inputs value from previous known min and max values to new ones,
here we pass the uv values through remap with new min and max values of [-1.0, 1.0]:
While remap is common it isn't actually built into GLSL so you'll see it either copied &
pasted or included via pragmas.vec2 vertexOffset = vec2(
remap(uv.x, 0.0, 1.0, -1.0, 1.0),
remap(uv.y, 0.0, 1.0, -1.0, 1.0)
);
Translating the vertices with the offset
Now we finish by adding the normalized offset to the worldViewPosition (position relative to the camera).
Normalizing a vector involves changing all its values (such as x and y) so that its length equals one.
Using the built in function we can take it for granted.
vertexOffset = normalize(vertexOffset);

worldViewPosition += vec4(vertexOffset, 0.0);
From any angle each vertex is now translated across the cameras xy axis resulting in a billboard-like effect where from the front it looks proportionally the same and from all other angles as a stretched rectangle.
This works in our favour as it results in a subtler yet effective effect.
uniform float u_effectBlend;
uniform float u_remap;
uniform float u_normalize;

varying vec2 v_uvs;

float inverseLerp(float v, float minValue, float maxValue) {
  return (v - minValue) / (maxValue - minValue);
}

float remap(float v, float prevMin, float prevMax, float newMin, float newMax) {
  float t = inverseLerp(v, prevMin, prevMax);
  return mix(newMin, newMax, t);
}

void main() {
  v_uvs = uv;

  vec2 vertexOffset = vec2(
    remap(uv.x, 0.0, 1.0, -u_remap, 1.0),
    remap(uv.y, 0.0, 1.0, -u_remap, 1.0)
  );

  vertexOffset *= vec2(-1.0, 1.0);

  if (u_remap == 1.0) {
    vertexOffset = mix(vertexOffset, normalize(vertexOffset), u_normalize);
  }

  vec4 worldViewPosition = modelViewMatrix * vec4(position, 1.0);

  worldViewPosition += vec4(mix(vec3(0.0), vec3(vertexOffset, 1.0), u_effectBlend), 0.0);

  gl_Position = projectionMatrix * worldViewPosition;
}
Using alpha maps to make foliage
When using custom shaders with Three.js there are two ways to use textures, the advanced way, and the simpler way.
The advanced way involves creating a fragment shader that calculates the color of each pixel of the mesh. Doing this for just the alpha map isn't that much lines of code but when you also want lighting to affect the mesh it's either more code you need to write with a load of math or including fragments from the Three.js shader library.
Understanding fragment shaders is still a great thing to have in your toolbox, definitely check out SimonDev's paid course "The Easiest Way to Learn GLSL" if you get a chance.
The simpler way which and what I ended up doing was using the CustomShaderMaterial library — it enables your material to be affected by scene lighting and be assigned textures without needing to write a custom fragment shader, unless you want to.
import { Color, MeshStandardMaterial } from 'three';
import { useTexture } from '@react-three/drei';
import CustomShaderMaterial from 'three-custom-shader-material';
import vert from './vertex.glsl.js';

export function Geometry({ enabled, remap, normalize }) {
  const alphaMap = useTexture('https://douges.dev/static/foliage_alpha3.png');

  const uniforms = {
    u_effectBlend: { value: enabled },
    u_remap: { value: remap ? 1.0 : 0.0 },
    u_normalize: { value: normalize ? 1.0 : 0.0 },
  };

  return (
    <mesh>
      <planeGeometry args={[1, 1]} />
      <CustomShaderMaterial
        alphaMap={alphaMap}
        alphaTest={0.5}
        baseMaterial={MeshStandardMaterial}
        color={new Color('#3f6d21').convertLinearToSRGB()}
        uniforms={uniforms}
        vertexShader={vert}
      />
    </mesh>
  );
}
Perfect!
If you dig into the vertex shader you'll notice one change was made to apply the result to csm_PositionRaw instead of gl_Position as CustomShaderMaterial takes the value and passes it onto the Three.js material shader.
-gl_Position = projectionMatrix * worldViewPosition;
+csm_PositionRaw = projectionMatrix * worldViewPosition;
Up next
Stay tuned for more content, in the next blog post I'll be going over updating the shader to add variance to the foliage so every tree can have its own flavor as well as going into detail how wind can be added.
Make sure to subscribe below and follow me on Twitter so you don't miss the next one, cheers for reading!